
The Open edX community has officially moved the needle again. Named after the Ulmo tree, the Ulmo release marks the platform’s latest biannual community release, part of Open edX’s established six-month release cycle. This isn’t just a routine update or maintenance patch, it represents a deliberate shift toward a more modular, secure, and learner-centric Open edX ecosystem.
Key Upgrades of Open edX Ulmo Release
The Ulmo release is packed with features that enhance every stage of the learning and administrative lifecycle. Here is what is landing in this version:
For Learners: Engagement & Clarity
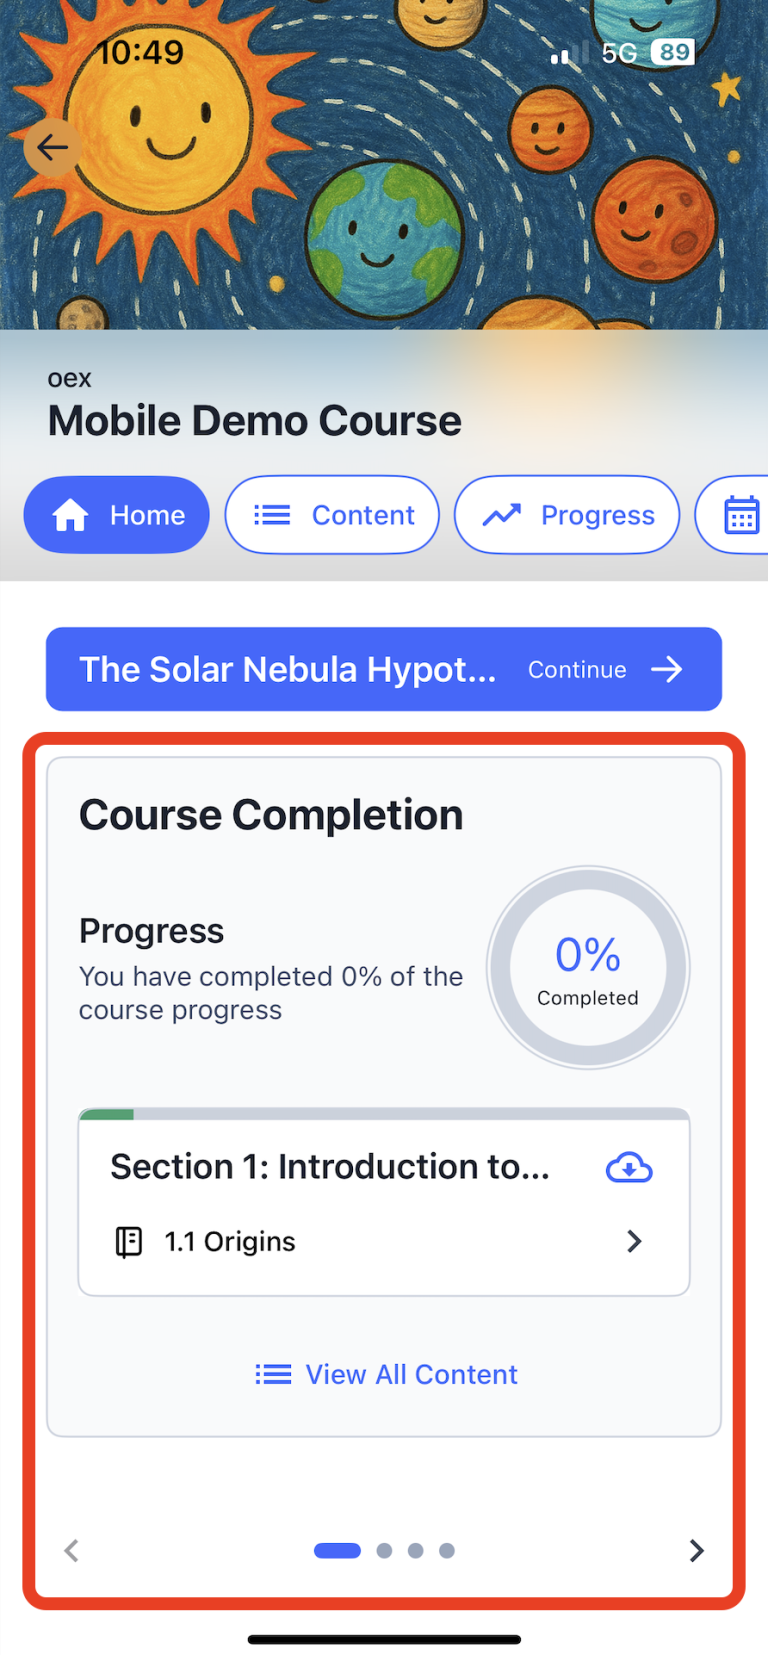
The biggest visual change is the Course Home. Previously, students landed on a somewhat static outline. Ulmo introduces a dynamic Course Home Carousel.
- New Course Home Hub: A complete redesign of the course landing experience.
- Course Home Carousel: A dynamic progress tracker that lets students resume exactly where they left off in videos, assignments, or subsections.
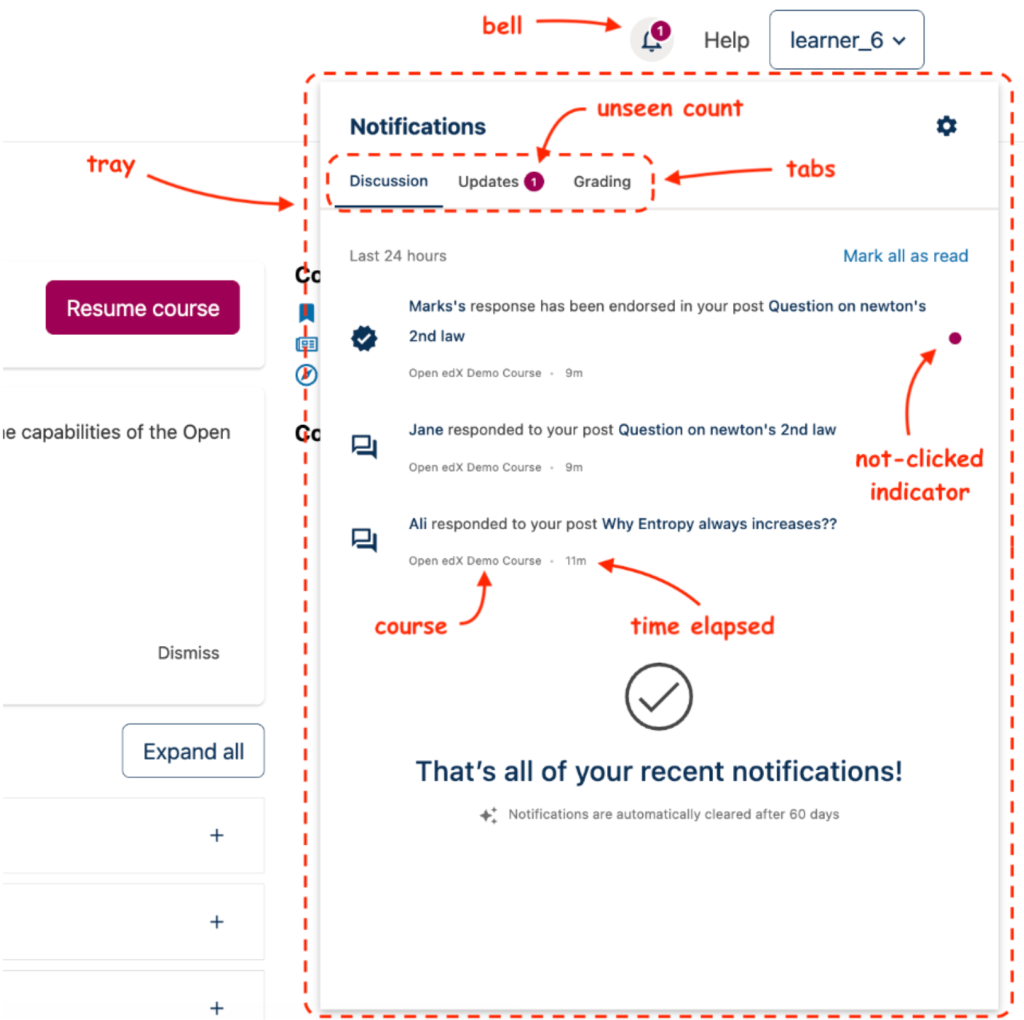
- Active Notifications: A new “Bell Icon” notification tray on the platform, supported by daily or weekly email digests.
- Enhanced Course Progress Tab: A dedicated, easy-to-read space for tracking grades and completion milestones.
- Filtered Content Views: The old “Videos” tab is now a “Content” tab with filtered views for All, Videos, and Assignments.
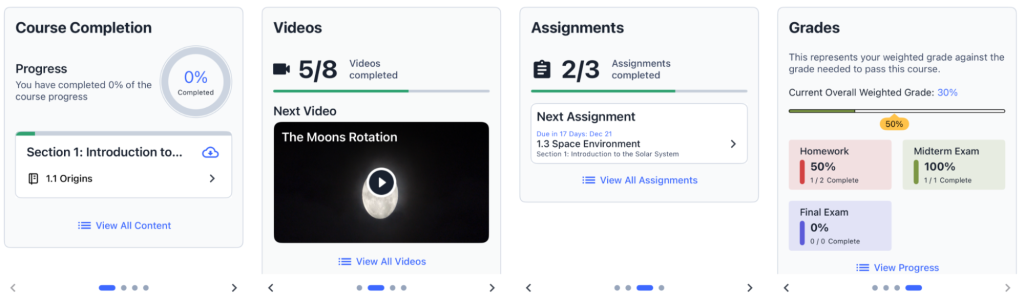
What this means for you: It’s “resume-play” for education. Learners see four distinct cards: Course Completion, Videos, Assignments, and Grades. Each card provides a direct “Action” button (e.g., “Start next assignment”) that eliminates the friction of navigating deep into course sub-sections.
The New Integrated Notifications System
In the past, learners often missed critical updates unless they were actively logged into a specific course or checking their spam folders. The Ulmo release solves this by introducing a sophisticated, multi-channel Notifications Experience.
1. The On-Platform Notification Tray
The first thing users will notice is the Bell Icon in the web header.
- Real-Time Awareness: A badge count appears whenever there is activity in Discussions, Grading, or Course Updates.
- Categorized Updates: Clicking the icon expands a “Tray” that organizes notifications by area, allowing learners to jump directly to a newly graded assignment or a reply to their discussion post.
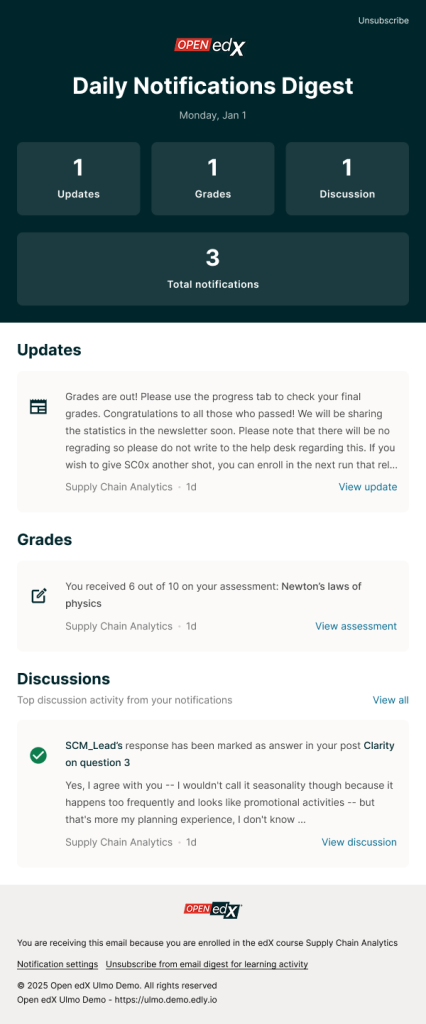
2. Intelligent Email Digests
To prevent “notification fatigue,” Ulmo gives users the power to choose how they receive information.
- Immediate Alerts: For the “must-know-now” moments.
- Daily & Weekly Digests: Learners can opt for a summary of the last 24 hours or 7 days. This is perfect for busy professionals who want to catch up on their learning progress during a weekend or a morning commute.
- Digest Scheduling: Site operators manually set the delivery schedule using cron jobs. This gives the platform central control over when all digests are sent.
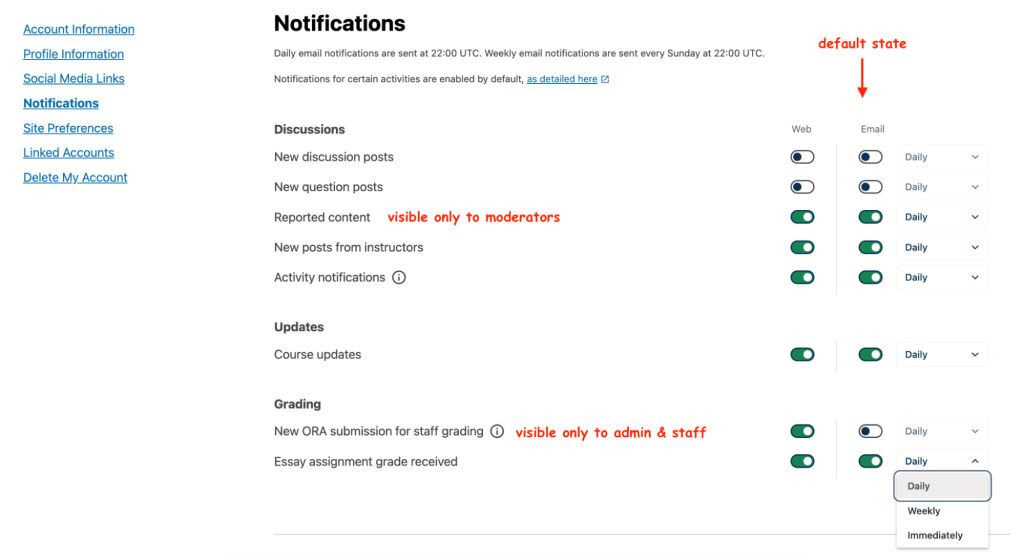
3. Granular Preference Control
Every learner works differently. The new Notification Preferences section on the Account Settings page puts the user in the driver’s seat.
- Channel Toggles: Users can independently enable or disable “Tray” vs. “Email” notifications for specific activities.
- Frequency Dropdowns: If a user wants immediate alerts for grades but only a weekly summary for discussion posts, Ulmo makes that possible.
For Course Authors: Modernized Content Libraries
If the new Learner Hub is the face of the Ulmo release, the updated Content Libraries are its engine. Ulmo introduces a significantly more powerful and structured way for course authors to build, reuse, and maintain learning content at scale, reducing duplication while improving long-term content consistency.
By expanding libraries beyond individual components and enabling structured authoring, Ulmo shifts content creation from a course-by-course task to a centralized, reusable workflow designed for multi-course programs and large teams.
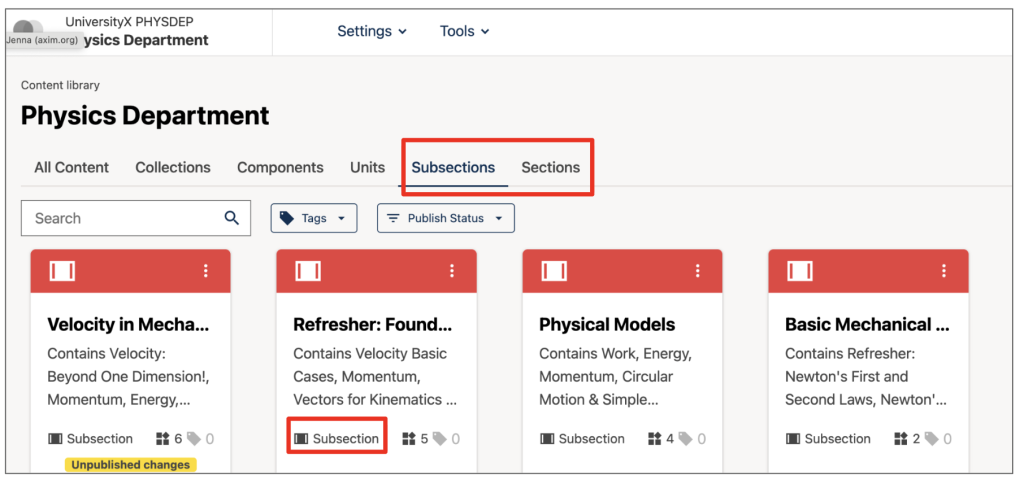
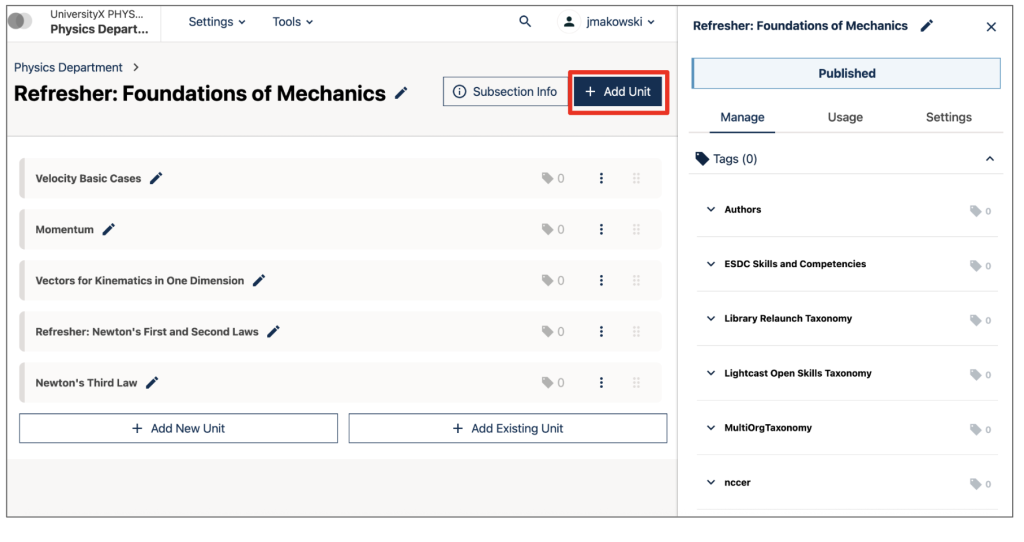
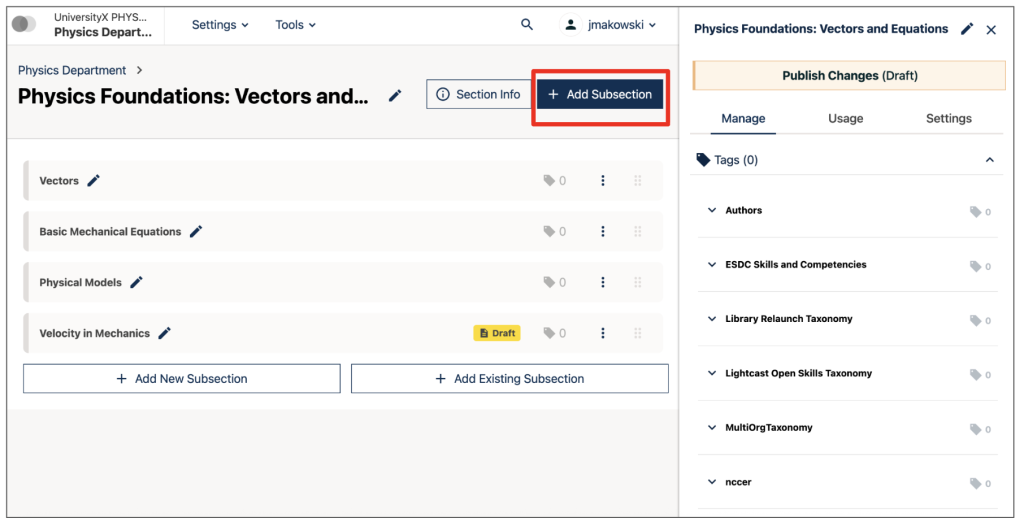
1. Structural Blocks: Building the "Deep" Library
Content Libraries now support Sections and Subsections. You can now author Sections, Subsections, Units, and content blocks directly within libraries for reuse across multiple courses. This means all levels of content management searching, filtering, tagging, and publishing—now extend to these structural blocks.
2. How-To: Creating Your Library Structure
Authoring within a library now mirrors the rich editing interface of a standard course.
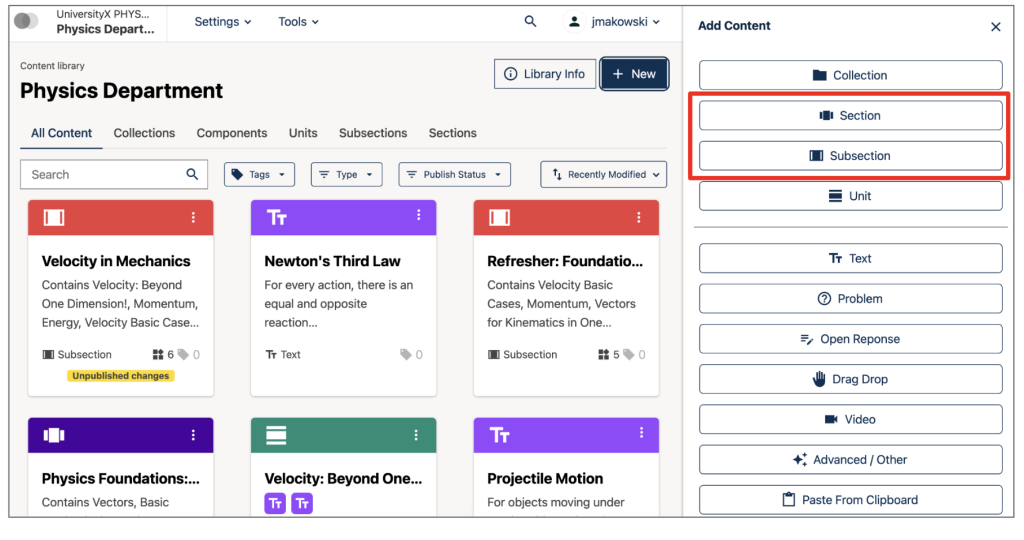
- To Create a Structure: Click the “New” button at the top of your library page. This opens the Add Content sidebar, where you can select the Section or Subsection buttons.
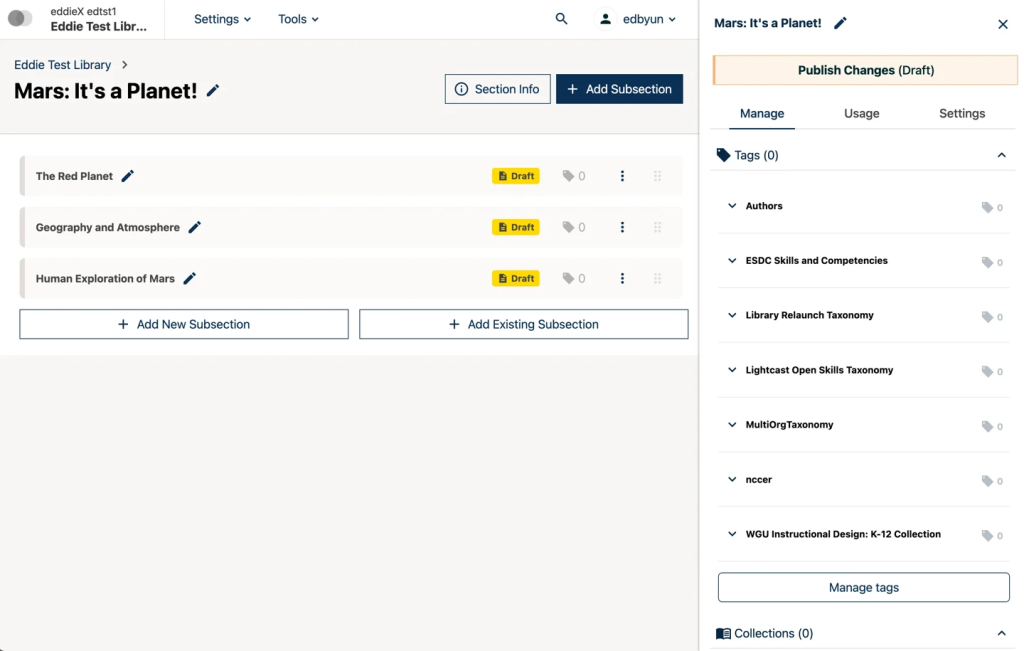
- Building the Tree: Once you’ve created a Section, you can open it and click “Add Subsection.” Within that Subsection, click “Add Unit” to begin placing your actual Text, Problem, or Video components.
- Permission Check: Remember, only users with Author or Admin roles can create or edit these structural blocks. (Contributors can edit content drafts but cannot manage high-level structural changes or publishing).
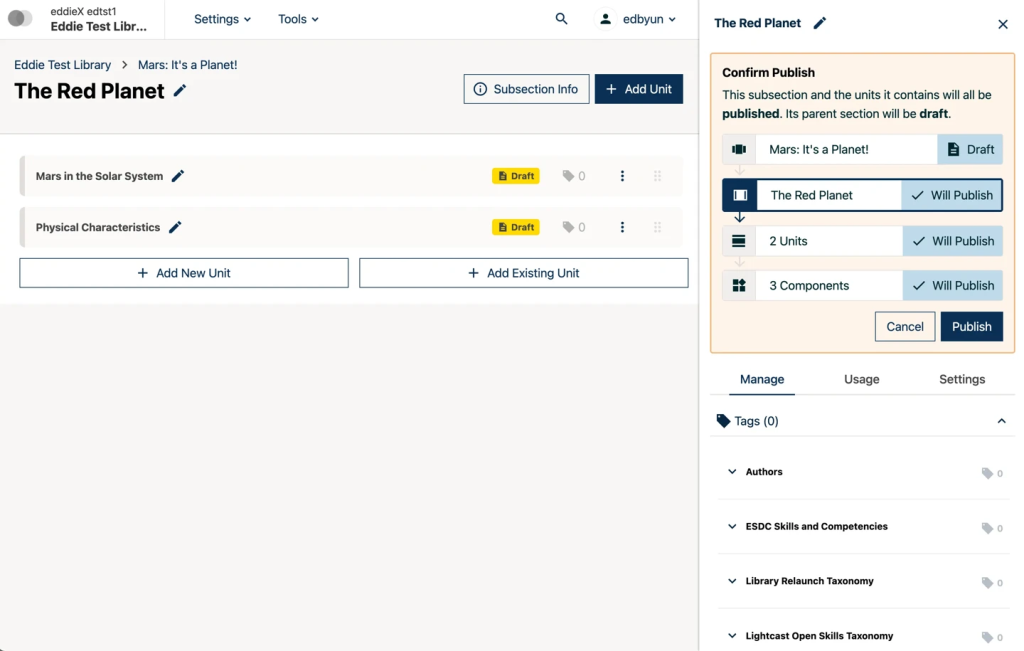
3. Smart Publishing: The "Top-Down" Workflow
Newly created content or edits are published via a new flow. Importantly, publishing a structural block will publish all contained content. For example, publishing a subsection will automatically publish all units and content blocks within that subsection, ensuring consistency across your course.
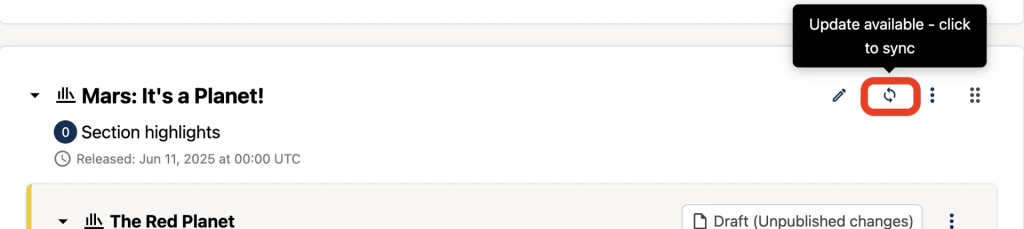
4. Side-by-Side Syncing: Ultimate Control
When changes to library content are published, course authors can choose to accept or ignore them.
- The Sync Pop-up: Educators can compare current course content with the new library changes side-by-side in a new pop-up window.
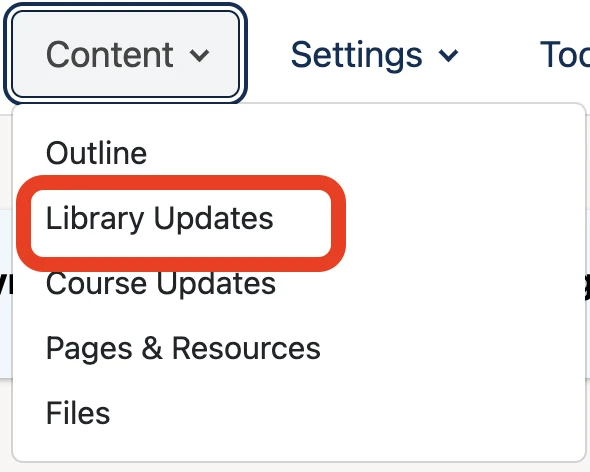
- Accessibility: This can be accessed via the sync icon on the Course Outline/Unit pages or from the Library Updates page in the Content dropdown menu.
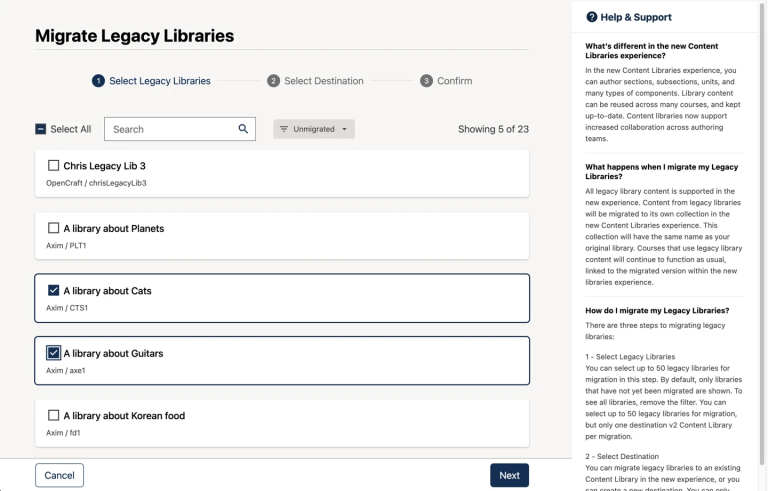
5. Legacy Library Migration
Ulmo provides a critical method for migrating Legacy Library content to the new Content Libraries experience.
- Editing & Remixing: Migrated content can be edited, and changes can be published to courses that were previously using legacy content.
- Urgency: In a future release, legacy libraries will no longer be supported. To maintain functionality and receive updates in courses, educators must migrate their libraries and update references.
For Administrators: AuthZ MVP & Role-Based Permissions
The Ulmo release introduces the first version of authorization model for Open edX, starting with Content Libraries. This AuthZ MVP is the foundation of the broader initiative to unify roles and permissions across the Open edX ecosystem, replacing fragmented or hard-coded access controls with a centralized, extensible approach.
For administrators, this means clearer role boundaries, improved auditability, and safer delegation of responsibilities, without disrupting existing library workflows.
1. A Unified Authorization Model
With Ulmo, the AuthZ MVP centralizes all library-level permissions into a single, shared authorization service.
While this release focuses on Content Libraries, the system is designed to scale in future updates to courses, forums, and other LMS components. The result is clearer control, consistent enforcement, and a stronger foundation for secure access management.

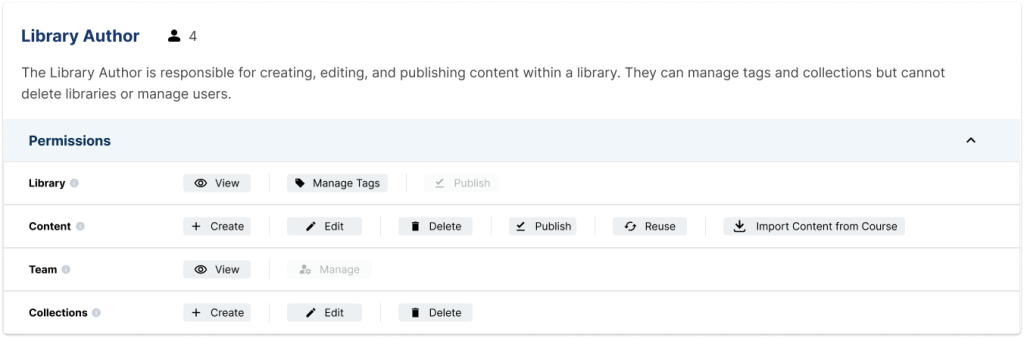
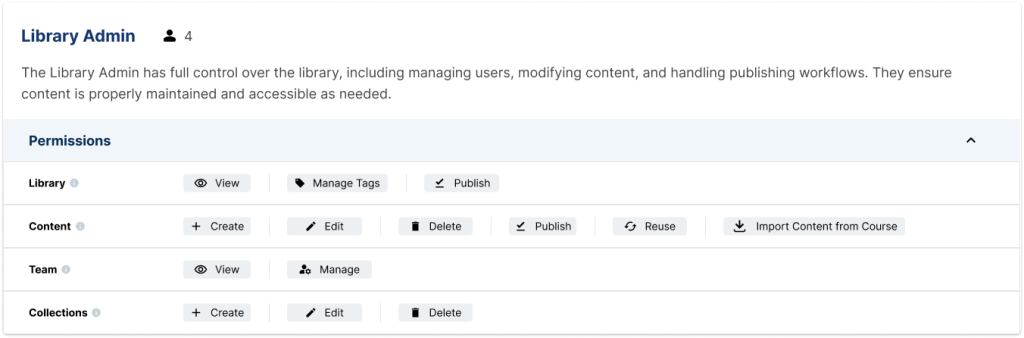
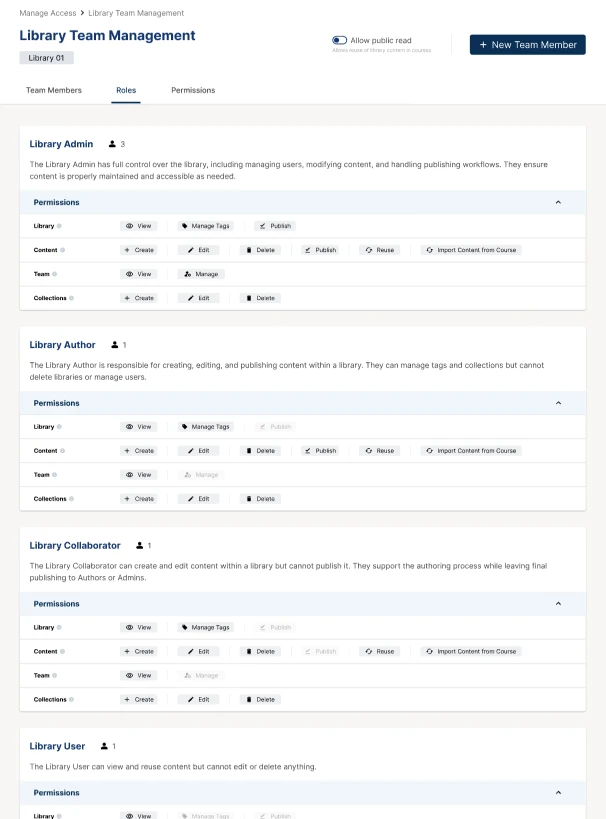
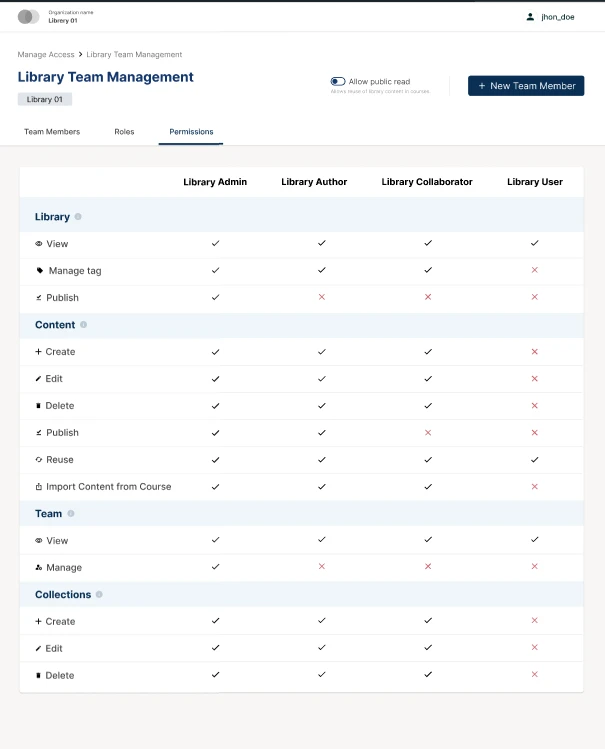
2. New & Refined Library Roles
Ulmo replaces broad “Staff” or “Admin” roles with four specifically scoped roles. This allows for Least-Privilege Access, ensuring users only have the power they need for their specific tasks.
| Role | Primary Responsibility | Key Permissions |
|---|---|---|
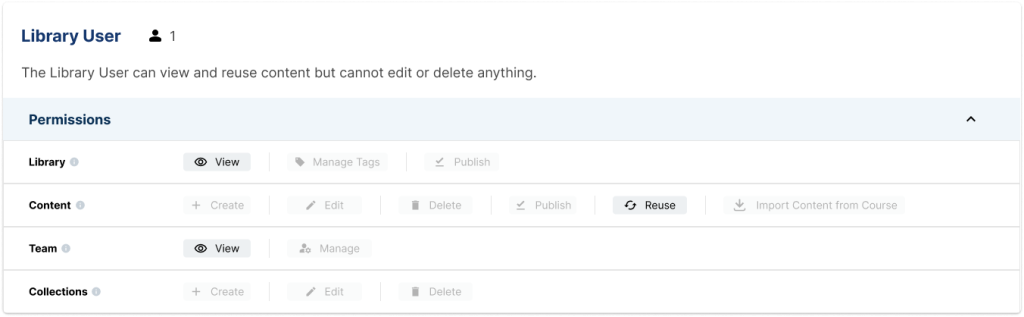
| Library User | Consumer | View, search, and reuse published content in courses. |
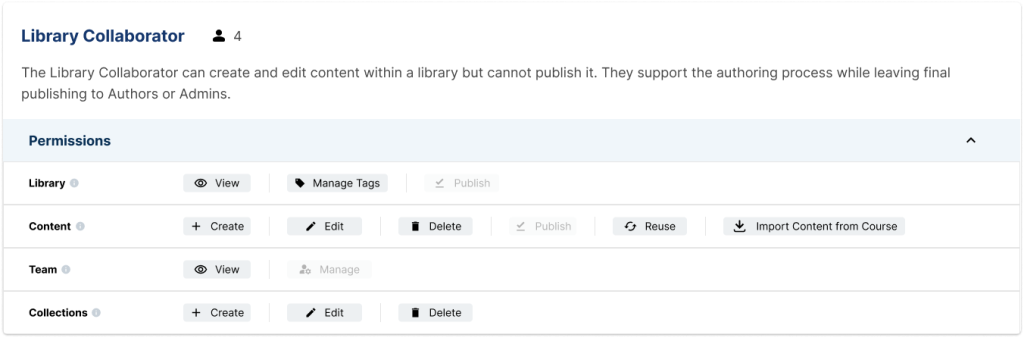
| Library Collaborator | Content Creator | Create and edit drafts; manage tags/collections. Cannot publish. |
| Library Author | Content Manager | Everything a Contributor does, PLUS the power to Publish content. |
| Library Admin | System Owner | Full control: manage the team, delete libraries, and toggle read-only states. |
2. The Three-Tab Management Interface
When you enter the Administrative Console via the “Manage Access” button in Studio, you are presented with three intuitive tabs:
- Team Members Tab: See exactly who has access. You can search by username or email and filter by role to audit your team in seconds.
- Roles Tab: A detailed dictionary. If you aren’t sure what role to assign, this tab provides a clear description of each role’s scope.
- Permissions Tab: The “Technical Lens.” This features a side-by-side comparison table showing exactly which actions (edit, publish, manage team, etc.) each role is permitted to perform.
3. Managing Library Access: A Step-by-Step Playbook
Pro-Tip for Admins: Only Library Admins and Global Admins have the authority to manage team members. Remember: permissions updated here apply only to the specific library you are working in, keeping your security boundaries tight.
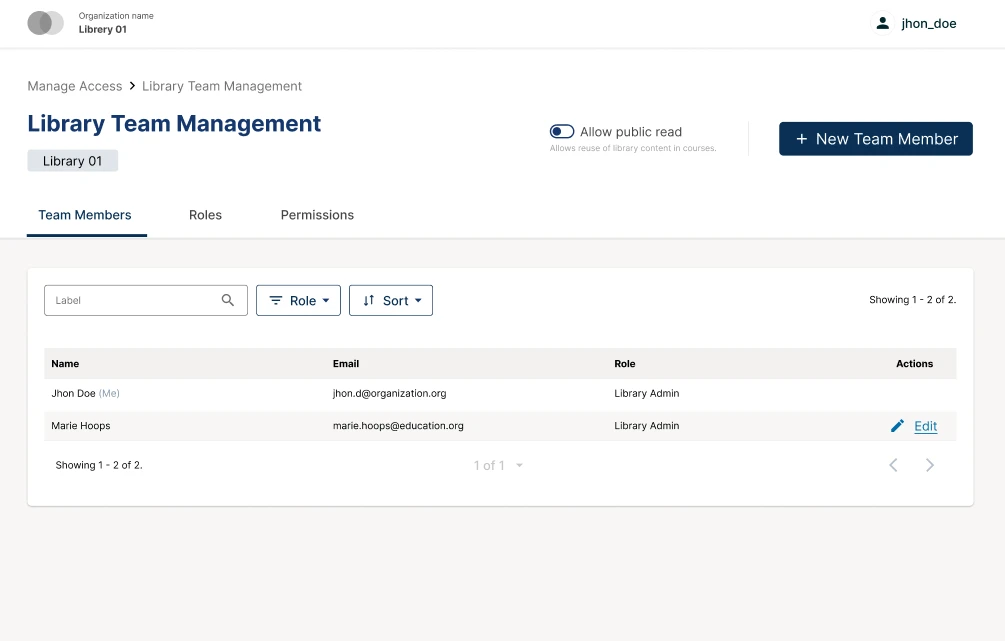
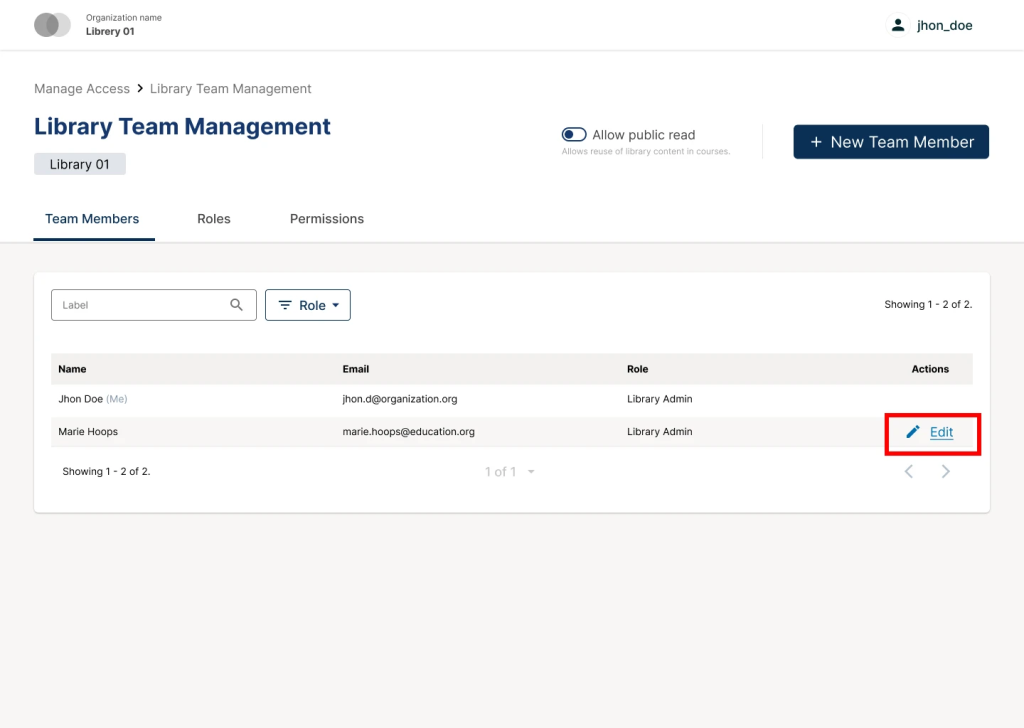
- Viewing and Auditing Team Members
To audit a user’s access or review the current team composition:
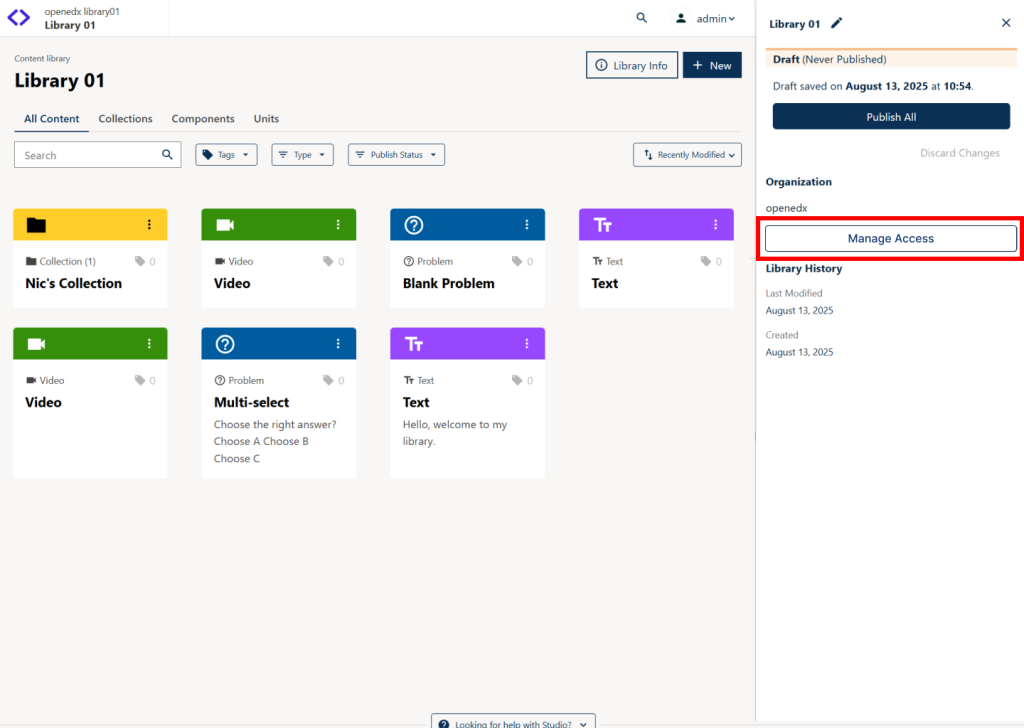
- Navigate to the library home page in Studio.
- Click the Library Info button in the top right corner to expand the right sidebar.
- Select the Manage Access button. This will launch the Administrative Console in a new browser tab, defaulting to the Team Members tab.
- Locate specific users by utilizing the search bar (by username or email) or by filtering by role.
- To view a specific user’s role history and permissions, click Edit in the Action column.
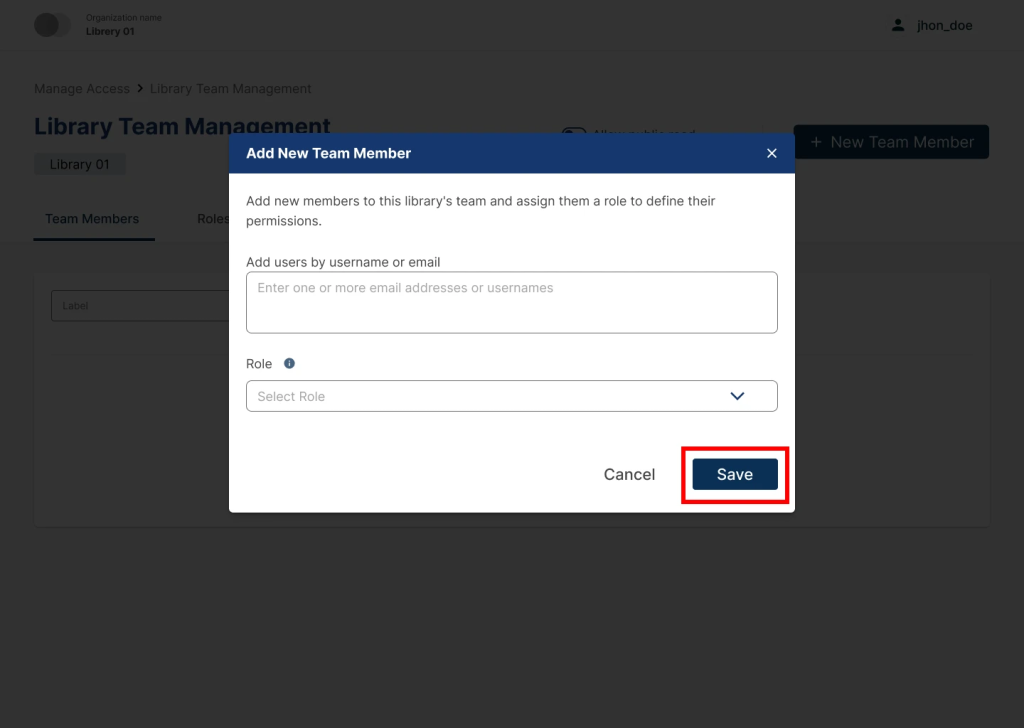
- Adding a New Team Member
To grant a new user access to the library:
- Access the Team Members tab in the Administrative Console (via Library Info > Manage Access in Studio).
- Click the Add New Team Member button located in the upper right corner.
- In the Add User Modal, enter the email addresses or usernames of the individuals. Multiple entries can be added simultaneously by separating them with commas.
- Assign the appropriate Role (e.g., Library Admin, Author, Contributor, or User).
- Click Save. A “Team member added successfully” toast notification will appear, and the users will be populated in the team table.
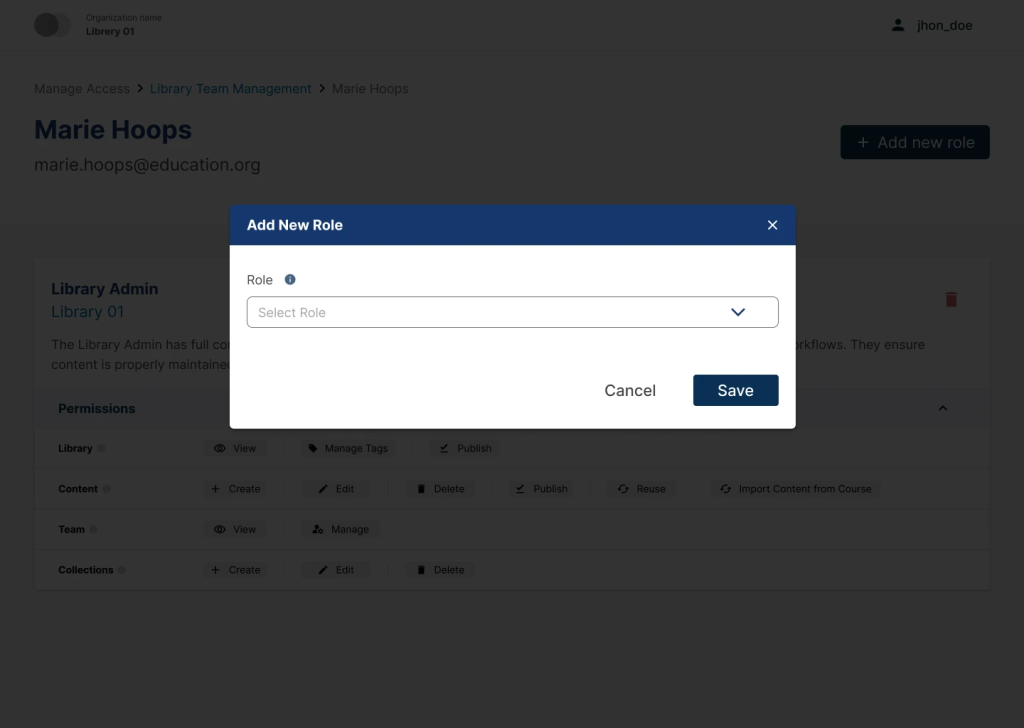
- Editing User Roles
Administrators can modify the level of access for existing team members to reflect changing responsibilities.
Adding an Additional Role: A user may hold multiple roles simultaneously. Their effective access is the cumulative sum of all assigned roles.
- From the Team Members tab, locate the user and select Edit.
- In the User Detail View, click the Add New Role button in the upper right corner.
- Select the desired role from the dropdown menu in the dialog box.
- Click Save. The new role will now appear in the user’s role list.
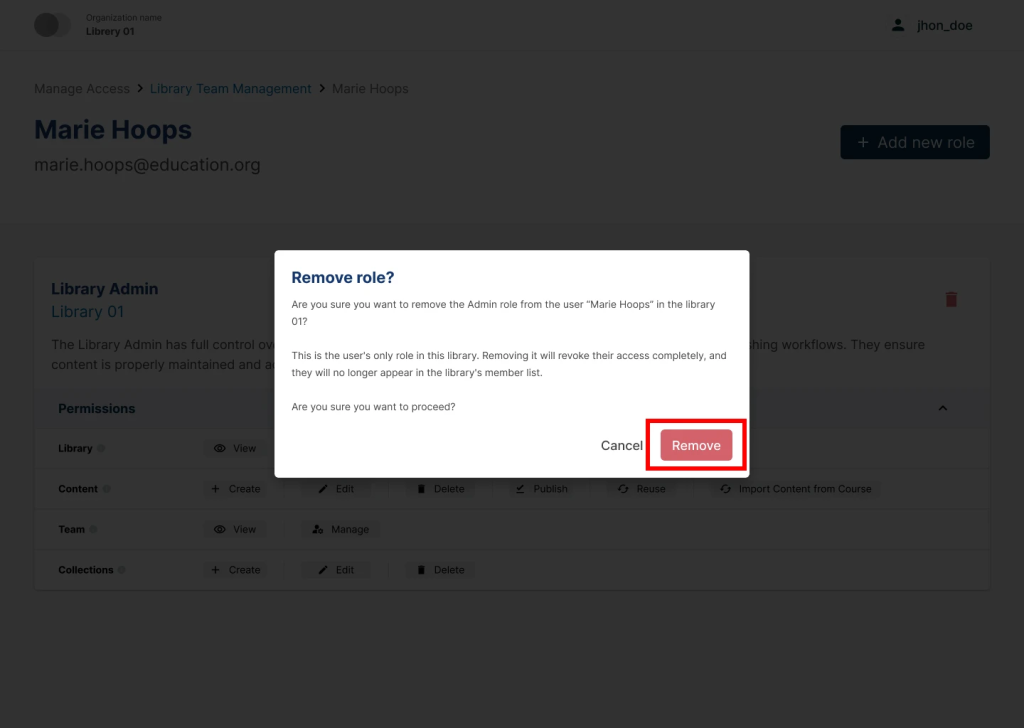
Removing a Role: Removing a specific role reduces a user’s permissions without necessarily removing them from the library entirely (unless it is their final role).
- From the Team Members tab, locate the user and select Edit.
- In the User Detail View, find the specific role to be revoked.
- Click the Delete (Trash) icon associated with that role.
- In the Remove Role Confirmation dialog, review the impact of the change and select Remove.
- If no roles remain after this action, the user will automatically lose all access to the library and will no longer appear in the team list.
4. The Migration Tool: Preserving Your Data
Site operators don’t need to worry about losing existing access settings. Ulmo includes a Migration Tool that automatically replicates current library roles into the new system.
- Automatic Mapping: During the upgrade, the system maps your current users into the new roles.
- Preservation: The goal is functional parity, meaning your team’s existing workflow stays the same, but the “engine” behind it becomes more secure and auditable.
5. Centralized Visibility in the Administrative Console
Previously, managing library access was tucked away in Studio settings. Now, any user with a library role can open the Library Team Manager within the new Administrative Console.
- Auditing: Admins can quickly see who has access, what role they hold, and which permissions are attached to that role all in one place.
- Transparency: This shared view helps large teams coordinate more effectively by knowing exactly who has the “Author” or “Admin” status.
The New Administrative Console MVP
The Ulmo release marks the birth of the Administrative Console, an extensible interface designed to centralize platform-level management. In this first phase (MVP), the console is specifically tailored for Library Roles and Permissions, replacing older, fragmented management workflows with a professional, unified dashboard.
1. Centralized Library Governance
Managing who can access your content libraries—the “vaults” for your reusable learning material has moved into a dedicated, searchable surface.
- Team Visibility: A dedicated Library Team Manager shows every user with access to a specific library, the roles they hold, and clear definitions of what those roles allow.
- Global Insights: Administrators can now view a comprehensive list of users across the entire instance, identifying exactly which libraries they can access and at what level.
- Role Overview: A built-in guide explains role permissions (view, edit, publish, or manage teams) so you can make informed decisions when granting access.
2. Sophisticated Access Control
The console isn’t just for viewing, it’s for active management:
- Search & Filter: Find specific users or permissions quickly using username, email, role, or library filters.
- Granular Management: Grant, update, or revoke access instantly.
- Role Stacking: Users can hold multiple roles simultaneously, and the console calculates their effective access—the total sum of all permissions they are granted.
3. How to Access the Console
Getting to this “Mission Control” is integrated directly into your existing authoring workflow:
- Open any Library where you have a role in Studio.
2. Click the Manage Access button in the sidebar.
3. A new tab will open, taking you directly into the Administrative Console, pre-focused on that specific library.

Scaling Integration: The New Centralized LTI Store
For institutions that rely on external tools like Zoom, Matlab, or specialized laboratory simulations, the Ulmo release introduces a game-changing efficiency: Reusable LTI Configurations.
1. The End of “Credential Fatigue”
Historically, if you wanted to use an LTI tool in ten different course units, you had to manually copy and paste the Client ID, Deployment ID, and secret keys into every single LTI block. This was a tedious, error-prone process that created significant security risks. Site operators now define the tool configuration once at the platform level (via the Django Admin).
2. Reusable Configurations in Studio
Once the configuration is in the LTI Store, course authors no longer need to see or even know the technical credentials.
- One-Click Integration: When adding an LTI Consumer component in Studio, authors simply select a “reusable configuration” from a dropdown menu.
- Scalability: If a tool’s URL or key changes, the site operator updates it in the LTI Store, and every single course using that tool is updated instantly. No more manual edits across hundreds of course blocks.
Operator Note: To enable this feature, ensure you install the ltistore plugin for Tutor. This is a mandatory step to utilize the centralized management interface.
Further reading:
Set up a Reusable LTI Store
Set up an LTI Consumer with Reusable LTI Configuration
Ulmo Transformation: A Comparative Impact Analysis
| Focus Area | Before Ulmo (Legacy Experience) | After Ulmo (The New Standard) | Business & User Impact |
|---|---|---|---|
| Course Entry | Learners landed on a static course outline; "Videos" was the primary non-outline tab. | The Learner Hub: Featuring a dynamic Course Home Carousel with one-click "Resume" actions. | Retention: Reduces cognitive load; learners jump back into content 30% faster. |
| Content Discovery | Media was mixed into the general outline; difficult to find specific media types. | New "Content" Tab: Offers filtered views for All, Videos, and Assignments. | Efficiency: Learners can instantly toggle to "study mode" (videos) or "exam mode" (assignments). |
| Library Structure | Flat organization; libraries could only store individual units or components. | Structural Blocks: Libraries now support full Sections and Subsections. | Scalability: Authors manage entire learning modules centrally rather than duplicating units. |
| Security & Access | Broad, "all-or-nothing" permissions (e.g., Staff/Admin) in Studio. | Granular RBAC: Specific roles like Library Contributor (can edit but cannot publish). | Security: Gives administrators fine-grained control over roles, making it easier to assign, adjust, and manage permissions across library teams without impacting other users or content. |
| User Notifications | Passive; users had to check course pages or rely on external email triggers. | Integrated Notification Tray: Real-time on-platform alerts (Bell Icon) and daily/weekly digests. | Engagement: High-visibility "pings" for grades and forum replies pull learners back to the site. |
| Management UI | Administrative tasks were scattered across various Studio and LMS menus. | Administrative Console MVP: A centralized, modern dashboard for platform-level management. | Governance: Admins have a single "Mission Control" for auditing users and roles across the instance. |
| Theming & UI | Reliant on complex SCSS variables that were prone to "breaking" during upgrades. | Modern Design Tokens: Standardized CSS variables (Paragon-aligned) for more stable branding. | Operations: Upgrades are safer and faster; branding remains consistent across the platform. |
| Technical Ops | Heavier Docker images; legacy code bloat; longer deployment cycles. | Optimized Build Times: Pruned legacy code (e.g., Proctortrack) and modernized build tools. | DevOps: Lower server costs and significantly faster deployment/testing pipelines. |
| External Tools (LTI) | Manual Redundancy: Credentials (IDs, Keys, URLs) had to be manually entered into every single LTI block in every course. | The LTI Store: Centralized, reusable configurations defined once at the site level and selected via dropdown in Studio. | Security & Speed: Eliminates configuration errors; sensitive keys are hidden from authors; updates to tools happen globally in seconds. |
Tutor-focused upgrades in the Ulmo
For site operators, the Ulmo release (Tutor v21.0.0) is a major technological “level-up.” This isn’t just an update to the Open edX platform; it’s a complete modernization of the Tutor build engine, designed to make your deployment pipelines faster, leaner, and more secure.
Here is the deep-dive into the Tutor-specific upgrades in Ulmo:
1. High-Speed Package Management with uv
- The Change: Ulmo replaces pip with uv, a high-performance Python package installer written in Rust.
- Impact: Docker builds and local environment setups are now 2x–5x faster, significantly reducing wait times for operators.
- Operator Flexibility: Builds remain compatible with pip using the PIP_COMMAND=pip argument for legacy workflows, making the upgrade seamless.
2. Tutor Deck Replaces WebUI
- The Change: The legacy WebUI is deprecated in favor of Tutor Deck, originally developed by Edly.
- Impact: A modern, browser-based dashboard provides full instance management, including a Plugin Marketplace to discover, install, and configure plugins reducing the need for SSH or command-line tasks.
3. Developer Productivity Boost: Livedeps
- The Change: tutor-livedeps is now included by default.
- Impact: Developers can sync local code changes directly into running containers without restarting the platform, accelerating the “code-to-test” workflow.
4. Updated Runtime Environments
- Node.js 24 (LTS): All Micro-Frontends (MFEs) now run on Node.js 24, providing improved performance, stricter runtime validation, and better Web API support.
- Python 3.11: Core platform stability is maintained, while uv ensures modern, efficient dependency resolution.
5. Developer Productivity Boost: Livedeps
- The Change: tutor-livedeps is now included by default.
- Impact: Developers can sync local code changes directly into running containers without restarting the platform, accelerating the “code-to-test” workflow.
How to Upgrade Your Tutor Instance to Ulmo
To move from Teak (v20) to Ulmo (v21), use the following standardized workflow:
- Update Tutor: pip install –upgrade “tutor[full]”
- Install LTI Store: pip install tutor-contrib-ltistore (Required for the new LTI features!)
- Enable Plugin: tutor plugins enable ltistore deck
- Sync Config: tutor config save
- Run Upgrade: tutor local upgrade –from=teak
- Launch: tutor local launch
- Search Reindex: tutor local do reindex_studio –initial (Crucial for the new structural library blocks).
How Edly Powered the Ulmo Experience
In the Ulmo release, the Edly team (the largest engineering and service partner in the Open edX ecosystem) has played a pivotal role in ensuring the platform is not just feature-rich, but production-ready for the most demanding environments.
While the community builds the “what,” Edly often builds the “how.” Here is a breakdown of their specific impact on the Ulmo release:
1. The “Mobile-First” Revolution
Edly has been a primary maintainer of the Open edX mobile codebase for years. For Ulmo, their influence is most visible in the Course Home Carousel and the Hub architecture.
- Redesigned Course Navigation: Edly’s work transitioned the mobile app from a “video-centric” list to a “content-agnostic” hub. This allows learners to see assignments and text-based content with the same priority as videos.
- Progress Tracking UI: The visual “circular progress” cards found in the mobile carousel were refined by Edly’s UX and frontend teams to ensure high performance on lower-end Android and iOS devices.
2. Tutor & “Indigo” Modernization
As the creators of the Indigo theme (the most popular Open edX theme), Edly’s upgrades for Ulmo focus on the new Design Token system.
- Indigo Theme 2.0: Edly has upgraded the Tutor-Indigo plugin to be fully compatible with Ulmo’s mandatory design tokens. This means operators using Indigo get a “free” upgrade to the faster, CSS-variable-based theming engine without having to rewrite their custom styles.
- Frontend Plugin Slots: Edly contributed several new “Plugin Slots” for the Tutor interface, making it easier for site operators to inject custom code (like analytics or help widgets) into the header and footer without “breaking” the core MFE code.
3. Open edX “Sandbox” & Demo Readiness
Edly manages the official Open edX Sandbox used by thousands to test new releases.1
- Continuous Deployment (CD) Scripts: Edly updated the scripts that allow the community to spin up a “fresh” Ulmo instance. This includes pre-configuring the new Administrative Console so users can test the Library RBAC features immediately.
- Credential Management: They streamlined the login process for the demo platform, ensuring that the new AuthZ (Authorization) service works out-of-the-box for student and admin roles.
Conclusion: The New Baseline for Excellence
The Ulmo release marks a decisive turning point in the Open edX journey. It is a transition from a platform of independent features to a cohesive, professional ecosystem. By centralizing administration through the Administrative Console, stabilizing tool integrations via the LTI Store, and prioritizing the Learner Hub, Ulmo has set a new standard for what a modern LMS should be.
For institutions, this release isn’t just about “better features”, it’s about strategic stability. The move to Design Tokens and the AuthZ security model ensures that your platform is built on a foundation that will grow, not break, as technology evolves.
The choice is clear: Upgrading to Ulmo is the only way to provide your learners with a world-class experience while giving your administrators the “Mission Control” they deserve. The future is modular, it is secure, and with the Ulmo release, it is officially here.